Friday, 8 July 2016

1st activitie: Olympic Boxing!

 I wanted to try boxing because it was interesting to write about. Boxing is my most serious thing I could do in life, in the olden days they used to use strips of leather to wrap around there hand, but right modern boxing gloves are designed to protect the fighter's hand during a bout. Boxing is a martial art and combat sport in which two people wearing protective gloves throw punches at each there for a predetermined set of time in a boxing ring. Boxing can get you anywhere on your bottle. Players would sometimes agree to be sensitive in the ring but some just want to get the game started, you may or may not get your head leaking (blood).
Wednesday, 6 July 2016
Tuesday, 28 June 2016

Monday, 27 June 2016

Thursday, 23 June 2016
Papermache Boat
WALT: Make a waka out of papermache.
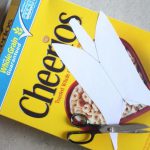 Our first step to making a waka out of papermache.
I have not finished yet but this is just a the steps to making the papermache paper.
1. cut it out on the dotted line – the solid lines are for scoring - there are little triangles on one end – you can fold those back to trace the line onto your cardboard and poke your pencil through the tip of the V on the pattern to mark your cardboard.
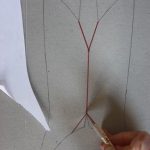
Our first step to making a waka out of papermache.I have not finished yet but this is just a the steps to making the papermache paper.
1. cut it out on the dotted line – the solid lines are for scoring - there are little triangles on one end – you can fold those back to trace the line onto your cardboard and poke your pencil through the tip of the V on the pattern to mark your cardboard.
2. Use a ruler to draw the lines as shown on the pattern. I’ve highlighted the lines to score in red. Use the BACK of your exact knife to score the lines in red and then gently bend the boat into shape.
3. Bring the edges together and secure with lots of scotch tape – they shouldn’t overlap but just meet and last tape the front tips together.
4. Trim any excess so the back edge is smooth and now you should have a little boat shape. Cut a strip of cardboard that’s about 1 ” by 3″.


4. Trim any excess so the back edge is smooth and now you should have a little boat shape. Cut a strip of cardboard that’s about 1 ” by 3″.
5. Bend that strip into a little triangle shape that fits inside your boat and tape it in , just a little closer to the front (bow ) than the back (stern), this will hold your mast. You’re ready to paper mache – I recommend 2 layers using different papers – so you can see when a layer is complete. You don’t have to let the boat dry between layers but I like to. I start with the inside of the boat closing up the little triangle space – you don’t have to fill it – just close it up.
6. Notes on paper mache – I find it easiest to do the edges first and the smaller the pieces of paper the smoother and stronger the finished result. I use golden harvest wheat paste. Add your second layer of paper, let it dry completely then paint it. I used a mixture of latex and water colour.
Here is my waka I made. FROM DIFFERENT ANGLES.

Here is my waka I made. FROM DIFFERENT ANGLES.


Tuesday, 21 June 2016
Bye Bye Uncle.
 Its been 2 month already and I miss some one important. My uncle left to Sidney for rugby he was chosen to play in a rugby team called sharks, so he was thinking and wanted to confirmed the form to go but at the same time he didn't want to because he knew if he left then it would be mizrable here in New Zealand without him. My uncle is a loving man he always loved to play sport, help others and mostly run up the mountain and when I wake up he's not back and sometimes I freak out but most of the time i'm smooth, but right now I am not getting the leaving thing he was the only one in my family that teached me how to run faster stay skinny and also cooking he loves cooking. Here is a link to his team photos and a photo of my uncle. SEE YOU NEXT YEAR! http://www.teamacademy.co.nz/athletes.html
Subscribe to:
Posts (Atom)